Showing posts with label DIY. Show all posts

Customized | Hairpin Desk

Two years ago, I rearranged my desk to refresh my room. Two years later, I switched it with a custom-made desk instead. Extra? You can say that. Necessary? I would like to think so.

lavlilacs Custom Hairpin Desk

lavlilacs Custom Hairpin Desk 2

I was originally hesitant to have a non-painted, original wood colored, tabletop because every other piece of furniture in my room is pitch dark. The birch wood is also out of place given how yellow my flooring is. This is partly why I went through all the troubles to have white hairpin legs instead of the industrial metallic look, at least then something will tie in with the rest of the room.

It might not be the prettiest desk nor the most refined piece of furniture, but it fits the space and crosses out all the issues I previously had with my old IKEA Malm desk. As far as desks go, it was generously spacious...especially when I had a smaller computer setup (i.e. laptop). As I sat in it for a while, I quickly developed a few small issues. But I generally loved the position the table is in so I set to find a happy medium.

Issues with old setup

1. My iMac monitor was too large for the depth of the desk—headaches and eye strain galore.
2. The corner of my room has a weird protrusion to cover pipes—table can't be pushed against both walls at once leaving large gaps and wasted space.
3. The original desk had support along the backside—hits against the radiator and blocks electrical outlets.
4. The table legs were closed off—difficult to see the trash can (which I leave next to the desk & out in the open).

lavlilacs Ikea Malm Desk abovelavlilacs Custom Hairpin Desk above
lavlilacs Ikea Malm Desk sidelavlilacs Custom Hairpin Desk side
Before
After

Of the problems I had, the only thing I could change was the placement of my computer and the desk itself. I tried to solve the depth issue by:

1. placing the monitor on the window sill and moving the table slightly away from the wall. However, the screen became a little too far and high for my sitting height.
2. placing the monitor on the furthest edge of the desk and moving the table closer to the wall. I would either find my face very close to the screen but my arms were comfortable or I sit so far back that my arms have no table space to rest on.

The perfect solutions seemed to be a combination of both; the iMac should sit as close to the window as possible and the desk should have a deeper tabletop.

Why didn't I just set out to purchase a table the size I needed? Apparently, the standard desk depth is around 25-26 inches. The depth I needed in order to forcibly sit far enough away from the monitor is closer to 32 inches or above. The extra 6 inches makes a huge difference! Solid wood butcher blocks could have been an option if I wasn't trying to keep costs low; plus, I had to cut a corner out which would have been a waste of a beautiful piece of kitchen-grade finished wood.

lavlilacs Custom Hairpin Desk planning

I drew the first sketch in 2016. It was just an unfeasible wish at the time. Every room in the house that needed a desk already had one. If I made one then, it would have been very unnecessary in many people's eyes. When my brother recently switched over from a laptop to a Windows desktop computer with the works (monitor, tower, keyboard, mouse, speakers, mic, etc.) his small desk (about 2/3 the size of the IKEA Malm) became overcrowded. My perfect excuse finally came!

The thought that DIY projects would be affordable is dangerous. It might be in some scenarios, just not quite so in mine. I wanted the most affordable version of a simple desk as I could get. Simple in the sense that it is minimalistic and easy to put together. Even still, a huge chunk of the cost went into the hairpin legs, then the plywood, then the paints & clear coat for the table legs, and other miscellaneous materials. Since my uncle generously helped me out, I saved money on a good deal on screws, clear coating for the tabletop, and machinery & equipment rentals.

What I Bought; $213.68 (including NY sales tax)

Set of 4, 3-Rod 28" High 1/2" Thick Raw Steel Hairpin Legs $98.30
1 sheet of 3/4" 4'x8' Birch Plywood $54.41
3 cans of Rustoleum Painter's Touch 2x Ultra Cover Paint + Primer in Flat White $12.99
2 cans of Minwax Water-Based Polycrylic Protected Finish in Clear Satin $29.98
Vinegar ~$4
Paintbrush ~$1-4
Paint tray ~$1
Set of 4, The Hairpin Leg Co. Hairpin Leg Protector Feet in White $10.00

What Uncle Spared Me; unquantifiable

3M Paint Sanding Respirator Mask $7.97/pack of 2
3M Blue tape ~$7-9
Lots of 1-1/4" screws ~$7-10/box of 100
Wood glue ~$5-7/bottle
1 Quart of Benjamin Moore Benwood Stays Clear Acrylic Polyurethane in Low Lustre ~$21.79

Table saw
Jigsaw
Miter saw
Clamps
T-square
Sander + sandpaper
Electric screwdriver
Vacuum with blower (for sand dust)

lavlilacs Custom Hairpin Desk process

In order to have the table length I had in mind, bowing (sagging) could have been a potential issue. It could have been exacerbated because the radiator would have sat right in the middle as well. The two possibilities were to have a thick tabletop by gluing two 3/4" boards together OR having a fake 2-layer top by creating framing around the edges and adding support in the middle. I chose the latter to keep costs low—an extra plywood would have been another $54.41!

Home Depot can cut boards. The one I went to did not make cuts less than 12". We needed our 48"x96" board to be cut into one 68.5"x34" (table size), three 68.5"x3.5"(4 edges), one 68.5"x3" (middle support), and scrap 27.5"x48" (leg support & extra). Since the store couldn't do make the smaller cuts, we left with 3 pieces (68.5"x34", 68.5"x14", and 27.5"x48") and my uncle made the rest of the cuts himself.

The worst part about Home Depot cutting a lower-quality plywood board is the chances of the cut edge splintering is very high, especially when going against the grain. Their machine is powerful and mainly used for rough cuts. It isn't ideal for furniture but what can ya do? The best we did was place the severely damaged sides where it couldn't be seen or felt.

My uncle chose to cut 45-degree triangles off the corners of the support beams to improve the aesthetics. He attached it with a light layer of wood glue and many many screws. This isn't a foolproof method, not all edges were completely stuck together...as long as the gaps aren't terribly large.

Sanding wasn't the most time-consuming since he had a mechanical sander. With that being said, there is still a lot of sanding to be done. Straight back from the store, sand. After anything else is cut a little bit, sand. Before anything is attached together, sand. After it is attached together, sand it again. After every layer of primer/paint/clear coat, sand sand sand!

The step that took the most time was unsurprisingly painting. I chose to forgo sanding in-between coats for this project. Even still, I found myself applying clear coats for multiple days because I had to cover both the top and bottom of the tabletop and giving sufficient time for one side to dry before flipping it over. The quart of clear coat gave me 2-3 very light coats on the underside and 6-7 very light coats on the top surface. Each coat needed 30 minutes of drying time before the next one could be applied and ~24 hours before it dried through.

While I waited for the clear coating to cure, I ordered feet protectors off Amazon since I did not plan on using a rug to protect the hardwood floor. The week wait was long yet completely worth it. The feet protectors I found were from a UK brand called The Hairpin Leg Co. and they luckily offered a white version. It isn't a true white, more like a creamy off-white. Once on and the table is right-side-up, the shadows help mask the color difference.

lavlilacs Custom Hairpin Desk underside

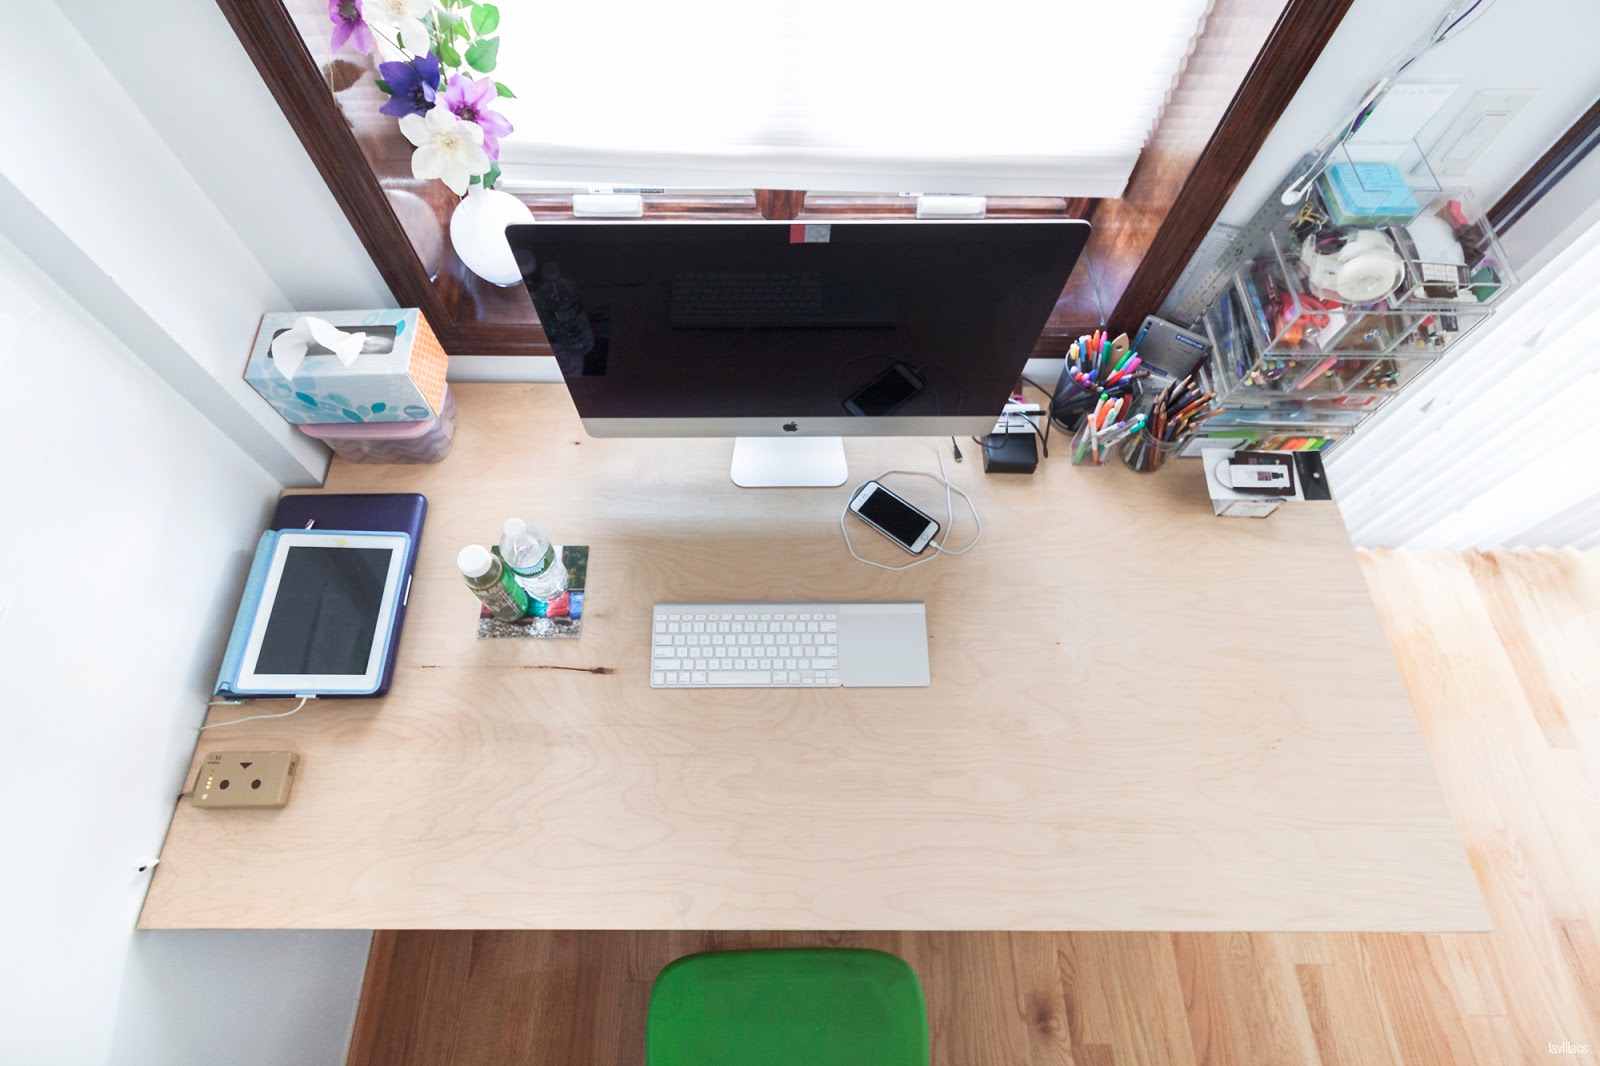
A better view of the table situation. How the top was framed. How the edges can finally reach the walls. How open the hairpin legs make the area feel. How all the outlets are fully accessible and with extras to spare.

lavlilacs Custom Hairpin Desk detailslavlilacs Custom Hairpin Desk details 2

My desktop monitor is now finally the perfect distance away. I no longer have to zoom in 2x, 3x times to look at websites. I do not have to arch my neck way back to look at the screen. I also don't have to go blind because the monitor is only a foot away from my eyes. My elbows get plenty of resting space while all my other junk can be sprawled all over. Glorious!

I will admit though, reaching for things across the table is much harder now unless I physically move my butt out of my seat. I guess this is a good thing for my body in the long run?

lavlilacs Custom Hairpin Desk cable organizationlavlilacs Custom Hairpin Desk details 2

Another nice perk to come out of the custom desk. No matter how accurately things are measured, it is probably impossible for tables to stick to walls without any gaps whatsoever. The benefit from the tiny gaps I have are the natural cable organizers. I did not have to cut a hole for the computer cable to pass through nor did I have to buy cord management systems to stick onto the desk. Huzzah!

And so that is the story of how my custom hairpin desk came to be. Hopefully, it will last a while without too much paint wearing down or splinters catching into my skin. That is the only fear I have with wooden furniture.

DIY Painted Hairpin Legs

Pinpointing exactly when I discovered hairpin legs is difficult. Sometime last year I became very invested in the idea of getting a custom desk done; I measured dimensions and even drew sketches. I liked the idea of having four posted legs instead of a layer of closed-off wood since my original IKEA desk had legs and table support which blocked off many of my electrical outlets.

The opportunity came to finally make this desk happen recently. Being the extra person that I am, sometimes often times, I became enamored with the idea of having white table legs instead of the raw metal look. The company I bought my hairpin legs from (DIY Hairpin Legs Co. not sponsored, but I wish...) does offer powder coated colored legs; it cost around $60 more to have it pre-colored. I was on a budget and an extra $60 seemed too pricey. Granted I am sure the quality of their paint job is eons better than what I could do and it would have saved a lot of waiting time.

lavlilacs DIY painted raw steel hairpin legs

Before I made the decision to DIY the painting, I tried to find as many tips as I could on blogs and forums. It was surprisingly difficult to find detailed How-Tos. Most posts I found just shared the photo of their beautifully painted hairpin/metal legs and just briefly mentions it was painted in so-and-so color. What prep is necessary? Sand or not sand? Prime or not prime? Paint with a brush or spray paint? I had too many questions!

Luckily, I was able to live chat with someone at the company I bought the hairpin legs from. He suggested that I first clean their raw steel legs with a degreaser because the raw steel variety comes with a light rust-resistant coating straight from the shop. Paint will not stick if not removed. He also said to scuff the cleaned metal with the included green side of the Scotchbrite pad. A non-smooth surface allows the paint to stick better as well. Apparently, past customers of theirs had great experiences with Rustoleum brand primers and paints. I was nervous about not using the right materials to prevent rust since the legs are raw steel.

lavlilacs DIY painted raw steel hairpin legs materials

Necessary Materials

Hairpin legs. Vinegar. Paper towels. Scrotchbrite pad. Maybe sandpaper. Spray primer. Spray paint in the desired color and finish. Spray clear coat in the desired finish. Respirator mask (not pictured but a must).

Recommended Materials

Googles or a not-important pair of old glasses for eyeglass wearers like myself.
Hat/hoodie to cover hair, gloves for hands, and long sleeves for excess skin (spray paint gets everywhere).

lavlilacs DIY painted raw steel hairpin legs cleaned

Since I am a very occasional DIYer, I was hesitant to buy a whole bottle of degreaser. My uncle, who is far more knowledgeable in construction-related things, told me regular vinegar should work just as well to remove the rust-resistant layer.

It took a lot of paper towels and manual polishing but vinegar got the job done: oily residue be gone. However! Despite going over the hairpin legs multiple times with fresh napkins, the paper towels always seemed to pick up a tiny bit more grease. At some point, I felt the rods with my bare hands and self-declared it clean enough.

lavlilacs DIY painted raw steel hairpin legs scuffed

The hairpin legs I used were raw steel, untreated in any sort of way and therefore could possibly rust. DIY Hairpin Legs Co. sends a kit with a bit of wax to coat the legs for the industrial metallic look. Painting the legs would theoretically also seal the legs in a sense that the raw metal isn't directly exposed to the elements.

If the legs are new and raw like mine was, only scuffing (lightly marking) is necessary after the cleaning process.

If the legs have been treated before with any kind of clear coating or paint, sanding with heavy grit sandpaper is a must prior to a wipe down of the dust.

lavlilacs DIY painted raw steel hairpin legs in progress 1

Rust is possible if any part of the raw steel is exposed. This meant that I had to paint every nook and cranny of the hairpin legs. Making sure every part of each rod was evenly covered in spray paint was a struggle—the rods are obviously rounded but they also have a small surface area and many tight spots.

Tip 1// Painting under direct sunlight helped shine a light on bald spots where any silver might be peeking through.

Tip 2// Paint in sections. I preferred to start with the top side of the L plate first (with paint and clear coat then let it fully dry for a few hours). Reason being? That is the side which will face the table top and be unnoticeable after it is secured screwed in. Therefore that face requires fewer coats of primer/paint/clear coat and equals less total drying time. After that side fully dried, I stood the legs up and painted and clear-coated all the rods.

Tip 3// Start your day early and reserve a good 2 to 3 nice-weather days to tackle this painting job. Spraying light layers of anything requires at least 30 minutes in between coats. I gave my legs a minimum of 3-4 coats of white paint and 3-4 coats of clear coating: 4 hours of just "in-between layers" waiting time just for the rod portion. It takes another 24+ hours after the final coat so everything can fully dry through (meaning accidentally scratches with your nail won't leave any marks in the paint). The spray paint is dry to the touch within 20-30 minutes after a layer but not resistant to nicks. Leaving extra waiting time for the paint to cure doesn't hurt.

**If touch-ups are needed, the total project time would be at least 5+ days. The spray cans I used suggests waiting a full 72 hours before reapplying once the shorter 30-90 minutes window has elapsed. Forums seem to say this is because the paint has a curing/drying period that chemicals inside will clash with. It is possible for new paint sprayed after 90 minutes but before the 72 hours passes to cause cracks and/or bubbles on the previous paint. If this makes any sense...

lavlilacs DIY painted raw steel hairpin legs in progress - importance of waiting

The above photo is the prime example of what happens when I didn't let the paint and clear coat fully dry through. I mistakenly assumed the paint was dried because I could run my fingers over it without smudging the paint or getting my hands dirty. I left that tester leg horizontally overnight and found it stuck to the kraft paper I laid it down on. By the time I removed the two, some of the paper was stuck on the leg and some of the paint ripped off as well.

Little nicks might not seem like much but it isn't just about aesthetics. I could have easily used this in a corner that faced a wall and never had to think about it twice. However! The thought of any exposed metal being prone to possible rusting had me worried. In the end, I chose to touch-up the bare spots with a little paint and clear coat.

lavlilacs DIY painted raw steel hairpin legs in progress 2

Painting the hairpin legs is just a small part of the mission. Sure it is difficult to get a hang of the spray cans and it overworks obscure muscles. The fumes from the spraying are also overwhelming. But the biggest challenge is the huge chunk of the time needed towards the waiting game. Once that part is over, I get some darn great looking table legs in return and $60 more in my wallet.

Here's to hoping I protected them well enough! No surface rust on my nice white hairpin legs pretty please.

Skunk Vine Rice Cake Balls 烏芹藤圓 | Taishan Eats

lavlilacs | Taishan Eats 台山美食 | Skunk Vine Rice Cake Balls - Foo Keen Haang Yuan - 烏芹藤圓

Skunk vine. Stink vine. Chinese fever vine. Paederia foetida. All those names refer to one type of plant. Yet not one sound remotely appetizing. Before I decided to make a record of this recipe, I hadn't a clue what the name of this ingredients was in English or Chinese. It was just something that was a part of a food Grandma used to make occasionally and something that I liked.

Good thing for the internet! It seems like this plant originated from eastern and southern Asia and grows mainly in tropical, hot and humid, climates. Some sources classify the skunk vine as a type of weed due to its fast growing and invasive tendencies. In Taishan, it is sun-dried and ground into a powder to be used in various foods.

Foo keen haang yuan 烏芹藤圓 is what Grandma calls the dark green, almost black, chewy spheres in Taishanese. I took it upon myself to, quite literally, translate it into skunk vine rice cake balls. There are also a couple of other Chinese names for this as well, cow poop ball 牛屎圓 and chicken poop vine ball 雞屎藤圓. Again, neither are redeeming in any way, shape, or form. But they really don't taste as bad as the name would suggest. Honestly!

I am a huge sucker for nostalgia. Despite my curiosity to try new things, I can't help but also yearn to revisit old favorites I have fond memories of. Recounting all those memories I made in Asia the last few months got me thinking about these unfortunately named treats that I remember Grandma made. But let's face it, my popo isn't getting any younger and the amount of traditional homestyle foods she's made in the recent years have greatly diminished. If I were to crave these in the future and knock on wood Grandma cannot make these unique foods anymore, it would become a lost art of sorts. I thought it would be an interesting way to not only keep a record of Grandma's recipes and learn about some Chinese traditions but also to spend more time with my popo.

Even if no one else finds this interesting, this will be my digital library of personal recipes.


lavlilacs | Taishan Eats 台山美食 | Skunk Vine Rice Cake Balls - Foo Keen Haang Yuan - 烏芹藤圓 | Ingredients

Skunk Vine Rice Cake Balls - Foo Keen Haang Yuan - 烏芹藤圓

Dry ingredients mixture
3 cups rice flour 米粉
1 cup glutinous rice flour 糯米粉
1-3 tbsp of skunk vine powder 烏芹藤粉*

Sugar paste
1 package of Chinese brown sugar 冰片糖 (or 1.5 cups cane sugar)
1 cup rice flour 米粉
3 cups water 水

* The amount of skunk vine powder is totally up to personal taste. Skunk vine is supposed to have a very strong sulphuric taste. The very traditional foods made with it, I think, uses a lot of powder to achieve a really pitch black final product. But I find the taste is too strong for my liking if I put too much (the most I've tried is 4 tbsp). Sourcing skunk vine powder outside of China might be a little difficult even in densely Chinese populated areas.

Directions
1. Mix the dry ingredients together. (I prefer sheet pan or anything wide and shallow. But a big bowl works too.)
2. Place the sugar and half of the water into a pot and bring it to a boil.
3. Reduce flame to a low-medium heat after all the sugar has melted.
4. Mix 1 cup of rice flour and the remaining half of the water together. Mix well!
5. Pour the rice flour + water into the sugar syrup when after all the sugar is melted.
6. Keep stirring the simple syrup and rice flour mixture until it starts to bubble and thicken. Before careful to not to burn the bottom.
7. Add the piping hot sugar paste to the dry ingredients mixture a little at a time to form a dough. Not all of the sugar paste will be used! Add just enough for everything to come together and not be sticky. A little paste goes a long way.

I recommend using chopsticks at first to stir the paste and the flours quickly. As the flour starts to make little clumps of dough, put on powder-free plastic gloves and start kneading by hand. If you can tolerate insane heat, then feel free to go barehanded.

8. Knead for about 10-15 minutes or until whenever all the flour and paste fully incorporates to form a dough ball. The dough should be soft, pliable, not sticky, and won't crumble when squished. A texture similar to fresh Play-doh. Even having a drier dough is okay. As long as it can be rolled into balls and still holds its shape relatively well.
9. Wet a bamboo steamer or place a steamer cloth on a pan.
10. Shape the dough into small grape-sized balls. Dog shapes are optional.
11. Boil water in a wok or pot.
12. Reduce flame to a medium and place the steamer full of rice cakes inside.
13. Before covering it with the lid, generously sprinkle water all over the rice cakes to prevent too much sticking and give it a nice sheen.
14. Steam on a medium flame for 30 minutes or until the rice cakes are cooked through.
15. Eat and enjoy!

lavlilacs | Taishan Eats 台山美食 | Skunk Vine Rice Cake Balls - Foo Keen Haang Yuan - 烏芹藤圓 | Sugar paste

The sugar paste should ultimately look similar to the above photo. It won't bubble a ton but it will make small spurts and be a little bubbly. This is also completely edible as is.

lavlilacs | Taishan Eats 台山美食 | Skunk Vine Rice Cake Balls - Foo Keen Haang Yuan - 烏芹藤圓 | Dough ball lavlilacs | Taishan Eats 台山美食 | Skunk Vine Rice Cake Balls - Foo Keen Haang Yuan - 烏芹藤圓 | Dough portions

The key to forming the dough is to work fast while the sugar paste is hot. Grandma says that the sugar paste is what helps to make the final product a bit soft. The glutinous rice flour also gives a slight chewiness. But overall, it should be quite firm with some chew.

If too much sugar paste is added and the dough is too sticky, add a little more rice flour or glutinous rice flour to the dough. If the dough is too dry, add a little more paste. If there is no more paste, add a bit of water. There isn't an exact science to this. Grandma just did everything by feel and approximation. She called me foolish for wanting to know exact measurements.

lavlilacs | Taishan Eats 台山美食 | Skunk Vine Rice Cake Balls - Foo Keen Haang Yuan - 烏芹藤圓 | Dogs

One of my fondest memories with these rice cake balls are the dog-shaped treats. I remember loving to pick those out whenever Grandma made them when I was a kid. The reasons for making them were never clear to me. They were just cute and unique amongst a basket full of boring spheres.

I only just learned from Grandma that these skunk vine rice cake balls are actually made for a specific Lunar calendar holiday, March 3rd 三月三節. When questioned, popo said she didn't know the specific reason for making such a food and it was just a tradition she kept by. Foo keen haang yuan were made to be eaten. The dogs were made to be hung by the outermost door as a home protector from bad luck and evil spirits.

Besides the skunk vine balls, she said bao kok (or ham sui kok) and something called wah hoi are also made in celebration of the March 3rd holiday.

Grandma's dog making method:
Pinch out a tail. Followed by ears. Then four legs. Get a toothpick and poke up the eyes, nose, and mouth. Her highlight was, of course, including a butthole for accuracy.

lavlilacs | Taishan Eats 台山美食 | Skunk Vine Rice Cake Balls - Foo Keen Haang Yuan - 烏芹藤圓 | Sprinkle with water before steaming

Grandma uses bamboo baskets to hold the rice cakes. The hole-y nature of it helped to let any of the extra water through. If not the rice cakes at the very bottom of a pan would be too soggy. She also suggested to only have 2-3 layers of rice cakes in order to avoid having any uncooked ones at the center of the pile. Keeping the dog-shaped ones on top will help to dodge any accidental severings of its delicate body parts.

lavlilacs | Taishan Eats 台山美食 | Skunk Vine Rice Cake Balls - Foo Keen Haang Yuan - 烏芹藤圓 | Grandma's homestyle foods

lavlilacs | Taishan Eats 台山美食 | Skunk Vine Rice Cake Balls - Foo Keen Haang Yuan - 烏芹藤圓 | my dog versus Grandma's

Like I mentioned earlier, Grandma hasn't made these in a while. I had forgotten how her "dogs" looked. Would you agree and think her version (on the right) looks owl-esque?

Red & Blue Velvet Mini Cupcakes

Red Velvet Cupcakes, Blue Velvet Cupcakes, July 4th cupcakes, mini cupcakes, cream cheese frosting, holiday baking
As with all holidays where my mom invites a bunch of people over, I love to take the opportunity to test out new baking recipes. She always criticizes me for baking and eating (a majority) of it by myself since my family usually isn't interested in sweets.

Even though I have been more into baking cakes rather than cupcakes as of late, I knew that the cakes for this occasion would be taken care of since the 4th of July also happens to be my brother's birthday. When paired with the fact that my mom invited a friend over who works at a bakery and always brings 1 or 2 cakes over as gifts...there would be just too many cakes to spare if I also added to the list.

I chose to break out my little mini cupcakes maker since the stove area would be crowded all day for the dinner preparations. We got this cupcake maker many years ago and it hasn't been used a lot at all. While it does "bake" the mini cakes very quickly, I found that the coloring of the cupcakes tend to lean towards the duller side. For those that like a consistent color all around unlined cupcakes, this machine might not be a top pick for you. The sides usually brown up by the time the cupcakes are fully cooked through. I can't say the exact time it took for the machine to finish "baking" a round of cupcakes though. Just watch the lights on the machine and have a toothpick ready to test.
Double yolk egg, extra large egg, white egg
Like most other baking trials I have attempted, I found the recipes for the cupcakes on Pinterest.
For the red velvet cupcakes & cream cheese frosting I used Sally's Baking Addiction's recipe.
For the blue velvet cupcakes I used the same recipe for the batter but switched out the red food coloring for Wilton's Royal Blue and a little bit of Wilton's Violet.

I stuck to the exact measurements as the recipe stated...for the most part. The 3 deviations I made were:
  • using 2 extra large eggs instead of 2 large eggs
  • using slightly less than the 1 cup of sugar
  • probably incorporated way less than 2 tablespoons of red food coloring
    • I used the handle of a spoon to scoop some food coloring until I thought the batter looked about red/blue enough
We got a nice surprised while I was making the second batch of batter. Once I cracked opened the egg and began to separate the yolk from the whites, I noticed how the yolk seemed like it was ready to spill out at any moment. After a closer look I realized it was because there was not 1 but 2 yolks sitting in the shell. This was the first time I've seen anything like it in person. I have heard about it while searching the internet before but this was a nice surprise. I even showed my grandma and she got pretty excited to witness this too. But one of my aunts said she's seen plenty in China before. (Way to burst my excited bubble.)

The mini cupcakes came out alright even with those few changes. My family isn't into things that are too sweet and using a little less sugar seemed to fit their tastebuds well. The final colors of the cupcakes could have been a bit more vibrant but then again who wants to have tablespoons worth of food coloring in their goodies anyways? I think these were good enough...don't you think?

While I made 2 batches of cupcake batter, I only ended up making one batch of cream cheese frosting. There was more than enough to go on all the little cakes since I piped the frosting very sparingly. The icing was supposed to resemble a big star but I thought my icing was a little too runny...so a blob like icing ring had to do. I was pretty surprised to see that the icing ended up holding it's shape well throughout the day & night.
Red Velvet Cupcakes, Blue Velvet Cupcakes, July 4th cupcakes, mini cupcakes, cream cheese frosting, holiday baking
Since everyone in my family has been very into fruits and berries lately, I decided to decorate the mini cupcakes with blueberries and cut up strawberries. Don't plan to top the cupcakes with the fruits before the day of serving, the juices will most definitely run all over the frosting. Otherwise if you have sprinkles or other decorations handy it would look just as nice.

A video posted by @lavlilacs on
After a long day of preparing, enjoying good food and company, and celebrating a loved one's birthday, nothing quite beats seeing fireworks out in my backyard. This year's mini show seemed much more extravagant. It also felt like it was a lot closer to my house than before. Maybe some people in my neighborhood put on their own show this year? Regardless, I am glad to be able to see it without having to fight the crowd near the Brooklyn Bridge.

Did you have a nice 4th of July (if you celebrated at all)?

Spikes


This bracelet is different from others that I made. Those had a pulling closure whereas this time around I added a toggle clasp. I think I much prefer this because I can easily put the bracelet on with one hand. But it also looks a lot less like a bracelet for a child, right? Or maybe that's just me...

I am very surprised at myself for still being interested in making bracelets after taking a semester long break. In fact, I was constantly itching to visit the bead store even when I was very preoccupied with school work. Maybe this means something? Who knows, but I do know that it has become the hobby that I'm most interested in recently. With my personality, I am probably going to be a little obsessed with this hobby for a while. (Hopefully it isn't one of my "three-minute hotness" interests.) However, since I make them only for myself right now, it is becoming a rather expensive hobby to continue with. I think I need either find a job or to start selling what I make. What do you think?

Nutella Cookies

After buying a jar of Nutella to make the Nutella frosting I made for the cake, I still had a lot of the chocolate hazelnut spread leftover. I know my mom would scrutinize me forever if I devoured the jar by myself. So I took to Pinterest to find a quick recipe that involved using Nutella. In case anyone was wondering...I didn't eat these all myself, I made them for my besties when we were meeting up during the winter break.

I found a pin with some cookies and a jar of Nutella with the caption something along the lines of 1 cup Nutella, 1 cup flour, and 1 egg. However, it didn't have the instructions for what temperature to set the oven for or the time to bake the cookies for. Luckily, this is a pretty popular recipe that many food blogs try out so it wasn't hard to find the missing information.
Easy Nutella Cookies
credits to Kirbie's Cravings (I'm not sure who the original creator of this recipe is, this is just someone I found through Google search)
Ingredients:
✻ 1 cup Nutella
✻ 1 cup flour
✻ 1 egg
Directions:1. Preheat then oven for 350 degrees Fahrenheit
2. Blend the ingredients together well
3. Ball up the dough and place it on a cookie sheet
4. Press down the dough so it is flat (because the cookie doesn't spread very much while baking)
5. Bake for 6-8 minutes
6. Wait for it to cool and then ENJOY!
I was very surprised to find that these weren't very sweet at all. But that could be because I am so accustomed to eating much sweeter cookies. I dusted some powdered sugar over top to compensate for the lack of sugar. My friend who isn't into sweets told me she loved it though. The cookie also isn't as chewy on the middle as I prefer in a great cookie. However, I did find another recipe that claims she has the right ingredients and recipe that'll make for a very good crunchy outside and chewy inside Nutella cookie. She also added sea salt into her cookies, which should give an interesting sweet and salty cookie. Click HERE for the recipe. It has a few more ingredients but the process is relatively the same (sans the flattening of the dough). I think I'm definitely going to have to give that a try the next time I buy a jar of Nutella.

Do you love Nutella? What do you like to eat Nutella with?

Yellow Cake & Nutella Buttercream Frosting

I know no one really wants to see cake photos, let alone a cake and frosting recipe, at the start of the new year but just wait before you click out of this page! Maybe it'll come in handy when you're craving something sweet.
There are just three words I have to say about Pinterest: I LOVE IT! There are only so many blogs and recipes I can find by myself. But now there is a place where everyone shares their finds and makes searching for things myself so much easier. See something you like, pin it for yourself, and go back to it when you're up for a challenge! Now I literally have a gazillion recipes, tutorials, outfits, and other inspirations I'd love to try. Since jumping on the Pinterest bandwagon, the next two are the first recipes I have tried and had successful results with.

I've never tried to make frosting from scratch before. But the photo on Pinterest made it look very fluffy and delectable. The plus of homemade frosting is being able to control the sweetness. Here's a link to the actual recipe if anyone wants to explore the website some more: CLICK HERE.
Nutella Buttercream Frosting
  • 2 sticks of room temperature (soft) unsalted butter
  • 2 cups of powdered or confectioner's sugar
  • 2/3 cup of Nutella
  • Pinch of salt
  • 1 teaspoon vanilla extract (optional)
  • 2 tablespoons of heavy whipping cream
Blend the butter and sugar until combined.
Add the Nutella in and blend.
Add the salt and vanilla extract and blend.
Add heavy whipping cream and blend.
I followed the recipe for the most part because this was my first time making frosting. I'm not sure what the difference is in adding the ingredients separately makes but I did it that way anyways just to play it safe. However for the next time, I will probably experiment with the powdered sugar levels. The only thing I did differently this time around was add a smidgen more heavy whipping cream because I thought the frosting consistency I had was just a bit too thick. In the end I had more than enough to give my cake a light layer of icing, add flowery/spiky decorations, and still had frosting to spare. I don't have any special gadgets for icing or decorating. I just use a good o' butter knife, a plastic flower icing tip, and a Ziploc bag.
The actual cake recipe I followed was pretty simple. I was contemplating whether or not to make it from scratch but remembered I pinned something rather interesting a while back. The photo description had something along the lines of "box of cake mix & Greek yogurt". Need I say more? I knew I had to try it! The recipe comes from the website Hungry Girl. I'm not too familiar with her but I've heard the Hungry Girl name here and there. I think she gives tips on healthier eating options? (Don't quote me on that.) She recommended to use a Devil's Food Cake mix but my family isn't too big on chocolate or dark looking desserts so I opted for a yellow cake mix instead. The directions are pretty simple. Just ignore the ingredients the box says you'll need.
Yellow Cake Recipe
  • 1 box of cake mix (your choice on what flavor)
  • 1 cup of Greek yogurt (unflavored)
  • 1 cup water
Mix the cake mix, yogurt, and water together until all of it is combined.
Bake according to the box instructions or until a toothpick poked into the center of the cake comes out clean.
The end result was very delicious. I used Fage Total 0% for the recipe and that's the type Hungry Girl recommended as well. I'm actually not a big fan of yogurt. Surprising surprising. Please don't judge! I just haven't gotten past the tangy flavor of it . But this cake didn't taste anything like yogurt at all. Instead, the cake itself was just very moist. I don't think I'm ever going back to using oil, eggs, and water for box cake mixes...ever!

These make pretty good and sort of healthy snacks don't you think? Of course definitely not the icing part. But if you just make little cupcakes sans the frosting, it makes for an awesome treat. If anyone plans to make this cake and icing and end up putting any leftovers into the fridge, I'd recommend microwaving your slice of cake or cupcake for a bit to soften the frosting and cake. The frosting gets much sweeter when it is cold and hardened. Plus cake just tastes much better when it's soft! Hope I didn't destroy anyone's keep fit/lose weight/eat healthy New Year's resolutions already. But I personally think this is a great alternative for those sweet-tooth cravings. Would anyone be interested in seeing how other Pinterest experimentations turn out?

Handmade Bracelets

I am the type of person who gets intrigued by things very easily. Sometimes it'll amount to something. Other times it just becomes another one of those "I wish I knew how to do that" moments and then it gets thrown into the back burner. Even when I do pick something up, there's not a guarantee that I will stay interested in it for a long time. As terrible as that sounds, I'm sure I'm not the only one who experienced this from time to time...right?

Recently, I have had such an itch to make my own bracelets. But with school and all, I rarely had the time to sit and even enjoy dramas and TV like I used to...let alone make bracelets. However, I was able to find a little time every now and again in these last couple of months to make a few bracelets to give away to you guys! There's still plenty of time to enter if you haven't already. Click HERE!! *I think my hands are bigger than average, so I used them as a guide. I hope these will fit whoever the winner is!!*

Here are some of the trendier and more unique designs that I put together.

At first, this cross bracelet wasn't going to be made with a leather cord or a pre-made closure. But I found that regular cotton cord knotting technique I had in mind would make the bracelet too flimsy. Hence another trip to the bead store was needed. But I actually like the final result a lot more than I originally imagined. This is the first time I'm experimenting with magnetic clasps. I haven't bought any bracelets which used such a contraption. I think that the idea is quite genius. Sometimes it's just very difficult to try and handle putting on bracelets by yourself, no? (At least I have that problem every now and again.) I cannot say how well the magnet will be in the long run though...


I used the same macrame knotting technique for the next two bracelets. It's great how many [sort of] different designs you can get with just one technique.

I actually ruined this fish bracelet. It originally had two beads to make it easier to loosen and tighten the bracelet. But...I bought beads that were cubes and copper in color. I ended up not liking the finished results at all. So I chose to remove them altogether. Now the bracelet fits very snug at its maximum length and it isn't the easiest to adjust the bracelet closure. I'm so sorry!

My most proud design. To be honest, I'm not very much into skulls anything. But it has been trending a lot in the fashion world so I thought you guys wouldn't mind as much as I did. After I put everything together, my mind completely changed. I LOVE this one the most. Usually, I end up making my bracelets just a little too small or a little too big. But surprisingly, this one is the perfect size and the closure is the perfect length. I am considering making one for myself. (Let's hope when that happens, it'll be just as good as this one was!)


Since I only buy enough material to make one bracelet each time I visit the bead store, things really started to add up. Maybe I'll invest in a whole roll of cord so it is more cost efficient? If that happens, are there any colors you guys would suggest I get? (Of course, this is assuming my interest in DIY bracelet making lasts for a long while.)

July & August 2012 Happenings


Hi, everyone! I really hate myself for leaving my blog not updated for a whole month. But nonetheless, it happened anyway *sigh* The last couple of months was jam-packed full of activities. In the short period of time, I went to quite a few places and tried many new things. Compared to the last summer vacation I had...this one was definitely more memorable! (I admit! I just lazed around the house before :X) I was able to even get my first job...although for my own good (mentally and grade wise) I resigned from my first job as well. It was interesting while it lasted though!

Enough of why I wasn't on blogger! & Onto what I actually did :]


Besties and I made it a must to hang out more often this summer vacation. Last year we said the same thing and ended up doing absolutely nothing together! In June we went biking. In July we went ice skating in the indoor rink at Flushing Meadows Park. It was so refreshing to be inside somewhere cool cold freezing on a hot summer day. Mental note...next time I must bring a hoodie, even if it's the summer! Skating inside was definitely different from gliding outside in say Bryant Park/Central Park/Rockefeller Center. A lot of skating students of much higher levels were skating around so it was a bit more embarrassing for us newbies to skate there. But after a couple of circles, it didn't matter anyways hah

After we had our share of fun, we headed toward Flushing for dinner. We planned to go to an all-you-can-eat Korean BBQ restaurant (Picnic Garden). Initially, we went there very excited. Sadly we left annoyed/disappointed. The food wasn't the problem. It was the service more than anything. Our group of 4 would get a couple of plates with a lot of food to grill thinking we'd sit and cook what we got a little at a time. However, the servers/waitresses would walk around and dump everything onto the grill (this was even before they had a dinner time rush!). We were rushed to eat and leave before we even started...I don't know if this is what happens at other similar restaurants but the four of us all agreed we'd be happier going somewhere else the next time we're in Queens.


In August we already ran out of ideas on what to do together. We always have somewhere we'd want to eat at but never anything to do! Since we decided to eat somewhere close to the Brooklyn Bridge (on the Brooklyn side) we decided to take a walk across it. As surprising as this may sound to non-New Yorkers, neither of us 4 have ever walked across before. It was very relaxing...even despite the heat that day. But please bring a lot of water (one bottle isn't enough)! We were all dying of thirst by the time we reached the other end. The walk was actually much faster than we originally anticipated. It took about half an hour to reach the other end. Do keep in mind, we were walking at our slow pace and stopped multiple times to take pictures and stare at the view!


Other than going out with the besties, I was also able to finally go to Dorney Park with my mom and brother. Times like this where I wish I had more courage to go on the 'fun' rides. Perhaps if I was with a group of friends who were also going on the roller coasters. By myself? Never! heh Instead, my brother and I spent most of the day in the water park area and boy did I get tanned. Sad to admit but I nearly drowned twice and even caused a big accident (my glasses had to be searched for...that's all I'm going to say) at one of the water slides. Oh, the troubles of not knowing how to swim and being afraid to stick my head in the water. I shall conquer my water fear...next summer! xD

MmmM! The yummy goodness~

My fave steamed rice noodle wrapped around donut(?) - 油條 (youtiao)!! Actually, this particular one was not so good...it wasn't crunchy enough!

The whole summer I was trying hard to curb my eating habits but sometimes when you're out...having a refreshing tea drink isn't too bad right?

Paris Baguette goodies

I think this was the Fruit Green Tea Cup Patbingsoo (팥빙수) & Berry Ade.

I really loved the Patbingsoo! I only wished I was eating it there with friends because even the cup size was too big for me to eat alone. Definitely a sharing food!
The Berry Ade, on the other hand, was just so-so for me. It tasted a lot like Sprite with a hint of berry. Perhaps they were just light-handed on the berry syrup?


Just like in June, I had a big cooking adventure. There were some big failures and great successes!

Curry ddeokboki & Kimchi Fried Rice (김치볶음밥)

I cheated and used a pre-made curry but it tasted pretty good nonetheless!

Fried rice, though, was amazing. (The photo is the first time I made the rice.) I don't know what I did differently the second time around but it did not taste right at all...*sigh* Just when my confidence in cooking was high!


The other fail dish: MacNCheese (left photo) & The more successful second attempt (right photo). Thank goodness it wasn't bad too since I made a big batch of the second one for both my brother and I. If it was terrible I'd either have to eat it all myself or it would go to waste...

The photo does all the talking no? It is easy to tell how bad the first attempt was just by looking!


The only baking I did was for a house party my family had in July. I love cheesecake! So I decided to give it a try and make it myself. After searching a dozen...or two...recipes I was surprised by how much cream cheese was used but it came out alright. I shall try a different recipe next time though! Anyone have one to share?

My other summer project: gardening. Well, to be exact...my mom put everything into pots and I just watered them every day. heh! Is it weird if I thought the lettuce seedlings were cute?


I couldn't believe how fast my lettuce plants grew, only been about a month!

Tomatoes...felt like it took forever to grow! Close to 2 maybe even 3 months? Some of the cherry tomatoes finally ripened. Perfect time for me to try cherry tomatoes (I've never had them before...) The iPhone's camera quality really surprises me when I get photos like these!


As for what I did the rest of my summer...

Watched the Olympics & Went to work

I quite literally woke up and caught the Olympics and went to sleep watching it as well!

Work is a whole 'nother story that is too long and complicated to share here. Let's just say there was a lot of stress and the first couple of days I felt like I was going to go crazy from all the pressure. Retail at a big store is scary...


Gave DIY bracelets a go


Made sure I used all my beauty products more than I did the last summer

And of course went shopping!
center
The dress I wish I bought from Forever21.

The trench coat that I've been eyeing from Uniqlo and bought a couple of days ago because it finally went on sale!

The outfit I wore (sans the pants...decided to wear something less skin hugging) to my job interview.


The booties I tried and decided was too much for me to handle right now (still need more practice walking in heels first!) &

The wedged sneakers from Steve Madden that I just couldn't pass up on!!

I literally saw these Olympiaa photos on Pinterest the night earlier and thought wow! it looks so close to the (way too expensive for me) Ash wedged sneakers. The next day Bestie C and I went to walk around 34th Street after class and I suggested to go into the store to ONLY try on the shoe to see if it'll fit me. Then I was completely suckered in by how comfortable they were despite being heeled shoes. Yet that wasn't the final kicker that made me purchase these...Steve Madden had a Scratch-off promo going on and I got a $20 off! The shoes are still much more expensive than I normally buy but from $99.95 to $79.95...it's probably the best price I can get them for before they go on sale and run out of my size completely (or perhaps I'm just trying to make myself feel better for buying expensive shoes in general ha!).

So that was my July & August for you! How were your summers?

Classes started last Monday. Hopefully, I won't be too caught up by school work that I ignore the blog again! Please don't get mad if that does happen :X