Showing posts with label Swatches. Show all posts

More Sally Hansen Polishes!

Ever since I tried Petrol, I've kind of been a little obsessed with this particular Sally Hansen line. When I saw that CVS was having a BOGO FREE for this line I made sure I went to check out what colors (if any) were left at CVS. I read the reason why these are being cleared from drugstore shelves is that the company is reformulating the line. I hope the new formula is at least going to be on par with the old formula. But I'll probably wait for a sale before I try the new formula version...heh!

Surprisingly, the selection at the CVS I usually go to was almost untouched (a big contrast to Walgreens). I guess compared to the Walgreens prices ($1.99) the CVS "sale" didn't look as appealing? Nonetheless, I was excited to see all the choices available! In the end I decided to choose the colors below. (The fourth one I picked up is going toward the giveaway!)

I've been wanting to try a red polish and a black polish for a while now but never got it because those are colors I feel I wouldn't wear too often. Especially since I have always associated red polish as a more mature shade. But since these were on sale and I liked their formula enough, I didn't mind making the purchase.


Sally Hansen Complete Salon Manicure in Right Said Red, Red Zin, & Midnight in NY

However, I was not very happy with the tricky sales method CVS had though...(well at least the CVS I went to). I went into the store having read that this particular polish selection was BOGO FREE. After I chose the polishes I wanted to get, I went to their price scanner to just to make sure they were on sale. Lo and behold, the Midnight in NYC (the black polish) was the only one to come out as BOGO FREE...while the two red polishes were BOGO 50%.

I asked someone (who I'm assuming was the store manager) and was told in an annoyed tone that only certain colors were BOGO FREE and I'd have to check all the polish prices if I wanted that promotion. Afterward I even checked their in-store circular to make sure what the actual sale was in case I read something wrong or the store had different terms than what was posted online...but that was not the case. The ad clearly said BOGO FREE for the Sally Hansen Complete Salon Manicure polish line and BOGO 50% for every other Sally Hansen line (excluding the Complete Salon Manicure polishes). In the end, I bought the polishes anyways because one of the red polishes only had one bottle left (impulse much? hah).

I don't know about others but in a way, I feel a little cheated...Or am I just overreacting and should just be happy that there was a sale in the first place?

Anyway!! Back to the polishes.


One layer of each polish.
Since they're all a jelly like formula they can be a bit on the translucent side if applied a certain way (like how the black color shown above is a bit patchy). I'd recommend not to fix the first layer when wet. Just to wait for it to dry and then touch up with a light second coat instead.

I'm still warming up to Right Said Red, the fire-engine red on my pinky, but it is a really pretty color!

Red Zin is a gorgeous blood red shade. Especially because of its jelly consistency it looks as close as nail polish can get to real blood, don't you agree? I never thought I'd ever buy this color because it seems difficult to pull off...but I ended up liking this shade the most of the three.

Midnight in NY looked like a really nice black with micro shimmers which kind of emulated stars in the sky (hence the name), but sadly it didn't translate very well onto my nails. Instead, it was ended up looking like a normal jelly black polish. In certain angles, you can see the micro shimmers but is close to being microscopic. I guess in a way it is an accurate depiction of the sky in NY since it is pretty difficult to see stars in the city. Maybe I'll grow to like this polish the more I wear it?


Two layers of each polish
Sorry for the blurry photo! I'm not use to taking photos with my left hand. It was surpisingly much harder to handle a DSLR and control focus with my left hand than I thought...

Since I didn't feel like taking off the polish I just decided to practice the tape nail art method on my pointer and thumb. These came out much better than the last attempt! (Yes I do have different designs and colors on my left and right hand. I didn't think I'd be able to wear these out comfortably and confidently but I've been sporting these for 2 days already!)


Drugstore Hauling

I haven't share one of these hauls in a while! Mostly because I've been spending a lot more on clothes the last couple of months and not as much on beauty items. But! I think I got pretty good deals at the drugstores this time. Well...much better results than from my normal couponing efforts.
After seeing that CVS had a BOGO50% for their Olay products and getting a couple of ExtraBucks to use, I decided to repurchase this moisturizer for the upcoming cooler weather. I was hesitant about getting two bottles of lotion but I definitely couldn't give this deal up when I scanned my CVS card and got even more ExtraBucks to use ($5 to be exact). In the end, I bought two and paid just the price of one!

Nouveau Cheap had posted about an awesome clearance of the Sally Hansen Complete Salon Manicure nailpolishes at Walgreens so I wanted to see if I would have some luck at my local branch. Needless to say...those displays were stripped bare!


Revlon in Buttercup, Revlon in Calla Lily, Sally Hansen Complete Salon Manicure in Petrol
I perused the store and found these in the clearance bins, which I don't normally pay much attention to (more like I don't ever see them). Each of these were $3. Then with the 15% off I received in the email for their Friends&Family sale...they ended up being only $2.55 each! There weren't that many choices in the clearance bins but these really stood out to me. I think I'm very lucky to have found the Sally Hansen polish in there! After googling this particular shade, I found out that it's apparently from the Sally Hansen & Alexander Wang collab collection. How cool is that!


One layer of the polishes: Calla Lily, Buttercup, Petrol

I was quite surprised by all three. Some good feelings, others bad.
The left two didn't quite meet my polish wants. Both are pretty sheer (on my defense I thought that Calla Lily would be more polish-like and less a shimmery topper). Buttercup was exceptionally streaky. I think it is because of how thin the polish consistency is. Definitely a 2+ coater. It doesn't look too bad in the photo but in reality it looked much worse.
Sally Hansen was the complete opposite. Opaque. One coater. Thick but not too gloppy (as of now). Dries fast. One word...UHHmmazing! Now I'm sad I didn't find out about this line earlier (before the big Walgreens markdown). I guess I could either track other Walgreens stores or wait for it to go on sale at other drugstore chains...


Two layers

Buttercup looks much better in this shot but I did make sure to put a thicker coat of it on the second time around. The problem then was the two layers took forever for to dry...*sigh*
Petrol didn't need a second coat at all but just for the heck of it I applied it anyways. With one layer it was already a pretty dark navy. The additional layer makes it looks almost black.

Are the polishes in the Revlon Colorstay polish line all similar to this particular shade?
& Was anyone able to get some of the Sally Hansen polishes?

Swatch Comparison: Missha M Perfect Cover BB Cream No. 27 & Maybelline Fit Me Foundation 210 Sandy Beige

I received an email from a blog reader a couple of days ago. I've gotten one or two way back when, but haven't gotten many recently. But this was so exciting! I know many of my readers are silent readers [I am too!], but if there is anything you're interested in knowing right away just ask! I don't bite. Especially not since we're communicating through the internet, of course. :] If I can answer you, I definitely will!

In her e-mail, the...my?...reader...she asked about a base product shade comparison, as you probably already saw the title of this post! I wonder why I haven't thought to do this earlier...Before I even think about buying a foundation or any base product at that, I search high and low to compare swatches all the time! I remember I had a difficult time finding photos of Missha M Perfect Cover BB Cream No.27 too (but this was when Missha had introduced this shade maybe a short while before I got the product).

I got this last September/October during Missha's Labor Day event. I already tried a sample of their BB Cream in No.23 and felt it was too gray and pink for my skin & at the time No. 31 had been out a while and judging from swatches/videos it seemed way too dark for my skin. Luckily they came out with the No.27 - Honey Beige. It seemed like the best option for me. However, when I went to Google...I really didn't come across any swatches of the then new shade. I was even more surprised when she mentioned she had no luck finding swatches to compare either and it is a good 6+ months later!


When it's all spread out like this, there is a pretty clear difference between the two products. One is clearly peachier and the other more yellow/golden.

However, when it is actually applied and blended, I could hardly tell the difference. I'd say that Maybelline Fit Me Foundation in 210 Sandy Beige and Missha M Perfect Cover BB Cream in No.27 Honey Beige are very similar in color. It isn't spot on identical though. But, of course, no one will be wearing the two [if they have both] at the same time on different sides of their face on a regular basis. This is just to show how similar they are in color! I've never been shade matched at MAC Cosmetics for their NC/NW color system so I'm not sure how these two compares to a MAC foundation per say. If anyone knows their MAC shade and also uses either or one of these two products, I'll add it to the post for future readers!


I cannot really give a review of the two base products because honestly, I have quite a lot of BB Creams and foundations in my collection and I don't wear them all the time. So I don't have many opinions on either...yet!

I haven't swatched all the base products that I have together yet but it will be another task for me this summer! Especially since I don't review my makeup items as often as I should be, at least leaving swatches for my readers is the least I could do! Again...If there is anything you're interested in just let me know. Don't be afraid to ask! I know how that feels too!

Swatch: OPI Lucerne-taintly Look Marvelous

I found that I really love how dark glittery polishes look on my nails. Something about how it creates shadows/depth that makes my very wide nails look so thin and pretty in shape! This isn't to say I don't love pastels of course! Also I find that microglitter is a way easier to remove than chunkier glitter polishes.

I actually got to try this particular polish shade when bestfriend bought it about a year or so ago. I loved it then but could never find it at the nail supply store myself. She said they were there but I could never spot it. Luckily we all went a few days ago and with her help I finally have one to call my own!

To what I can see...this is a metallic black with fine purple green and silver microglitters. However don't quote me on this since I'm not very versed in the nailpolish vocabulary department.


With one light layer.
It doesn't look this bad in person, really! I think the flash made a bit more extreme.

If you really want, I think you could wear one layer. I probably would if I didn't have the time to sit and wait for many layers to dry. I don't think that under normal circumstances, you'd be able to see the nails this much. It'll probably look like how the ring finger looks...or a little darker.

After this point, the swatches are with 2 layers of the polish and a base and top coat.


Indoor lighting + Flash

Forgot if this was natural or artificial lighting...but this definitely had flash

Natural Lighting + Flash

Natural Lighting + No Flash

What are some of your favorite polish shades?

Swatch: OPI Last Friday Night

In an effort to clear my Drafted Posts list...here is another nail polish swatch for everyone!

Remember this swatch?


Since I already shared how OPI's Last Friday Night is over a blue polish, here it is over white.


Please excuse the mishap on my pointer finger!

I used Essie Marshmallow as the white base. I think I used about 2-3 layers to build the white up. I don't really recommend it unless you have a lot of time to wait for the layers to dry. Marshmallow applies rather sheer and streaky. (Works better for a French tip mani though!) I think I used about 2-3 layers to build the white up.

The effect of Last Friday Night and a white polish is much softer and not as bold. I actually prefer this combo over the former one, just personal preference.

I would love to wear Last Friday Night with another white though...the hunt continues!

Any suggestions?

Swatch: Hello Kitty Blueberry

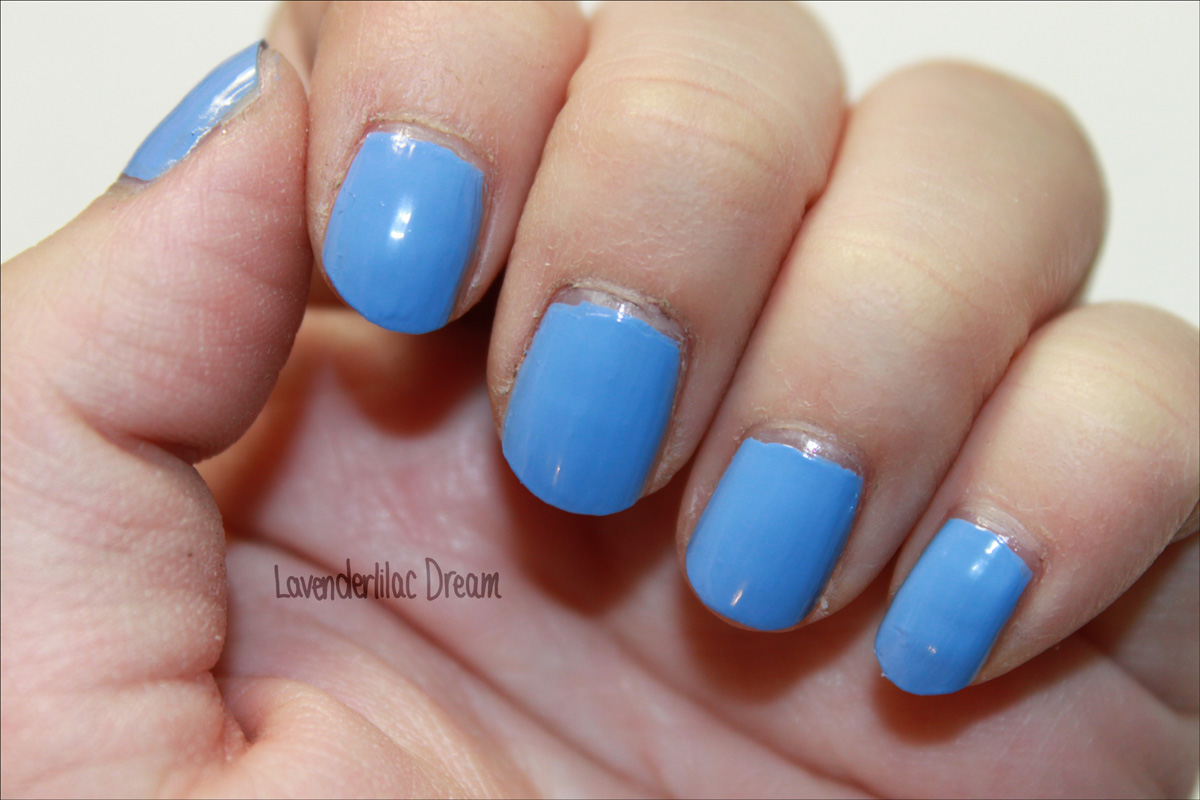
The first polish that I bought from Sephora...Blueberry from the Hello Kitty polish line.
This is one of the few blues that I own and feel comfortable wearing.


Sephora describes this as an "opaque pastel periwinkle blue".


One layer! Pretty sheer and applies spotty...But surprisingly it was VERY easy to apply.


Two layers & Much better!

But as you may (or may not) see on my pinky, a little of my nail & some of its ridges still peeked through. I was still satisfied with this, but you can easily go with 3 layers. If I remember correctly, this polish tried pretty quickly as well.


2 layers...Natural Lighting + Flash


2 layers...Natural Lighting + No Flash


On separate occasion, I wore:
2 layers of Blueberry + 1 layer of OPI Last Friday Night ... Artificial Lighting + Flash


Ahh! Look what happened to the polish. This was a long time ago, but the whole piece of nail polish came off from almost every nail! I don't know if it's my Top Coat or Last Friday Night but this has never happened with any of my mani's before...Not with Blueberry alone, not with Essie Good to Go top coat...never! There's always the usual & gradual chipping, but nothing like this :O

Swatch: Butter London Branwen's Feather

These pictures were edited and sat in my Photobucket account for a long time now. I almost forgot about them until I finally had the time to double check my photos over the winter break. Sorry!! >__<

After not wearing nail polish for the entire summer, the first shade I really wanted to wear again was this (Butter London's Branwen's Feather). Maybe I wasn't used to how dark it was or my hands were just unusually dry, looked more wrinkly, and stiff that it felt weird having such a dark polish on my nails. But if this is the first color I want to wear it must mean something right? :P I still haven't worn this out yet this season. Instead, I've opted for the lighter colors. I'll wear this again...possibly soon!


This is the very first expensive nail polish I bought. I stumbled upon it when I was at Ricky's in Soho. I don't know what made me actually fork out the money for this polish, but I'm glad I tried at least one of butter london's polishes.


Taken in artificial lighting

I can't say for their other shades, but this particular one applies and dries very quickly! Especially if I put a thinner layer. Then, I just put another coat and it is usually opaque enough and with no streakiness. However, if I'm lazy, I can get away with one slightly thicker coat of this polish. To what I can remember, I didn't have any indent incidents with this polish at all.

The polish looks pretty much the same (to me at least) as it does in the bottle. I have yet to come across one that isn't...But, under certain types of lighting the polish will either look like a purple to dark purple or black with a slightly purple hue.

I also like the fact that they are a 3-free company. I wasn't very much aware of those 3 "bad chemicals" in nail polishes until I read about it on a nail blog about it. It's always nice to be on the cautious side.

Overall, if there is a particular shade I feel I absolutely cannot live without it and I happen to come across it in a store OR if I had a job and extra cash to spend I would definitely want to purchase a few more butter london polishes. However, these are way out of my budget range for polishes as of right now =X I can only dream of the next time I could try another one of their shades hehe ...


Taken under natural lighting

Branwen's Feather with Essie Matte Top Coat on ringer finger

This occasion I wore Branwen's Feather, I was also experimenting with the Essie Matte Top Coat. I think in the end I put the Essie Matte Top Coat onto the others as well. It felt a bit weird to me...I still haven't gotten used to the matte look. With the Matte top coat, the polish actually just looks like a lightened black with some shimmers. The top coat actually wears away after a few days.

Has anyone tried expensive polishes before? Which one(s)? What did you think of them compared to others like OPI, Essie, and drugstore polishes?

Swatch: China Glaze Sea Spray

This was the small purchase that I made a couple of months ago during the Lunar New Year parade. It was definitely not planned but Sea Spray was definitely on my wishlist. Especially after a few bloggers compared it to Chanel's Riva (which is a very beautiful color that I can only dream of getting right now lol). Believe it or not..this is the second China Glaze polish in my collection. I've got to say, I prefer OPI's wide brush applicator versus China Glaze's narrow rounded brush applicator. Especially difficult to apply if the polish thickens.

Sea Spray is a great baby blue with very fine shimmer that you can't see unless you bring your hands really close to your eyes..or unless you have supervision :P I wish it was a bit more visible though. Visible yet subtle is a great way to go for this type of blue IMO. To my surprise, this blue didn't clash with my hands' skin tone like OPI's What's with the Cattitude? I haven't been able to bring myself to wear the latter alone because it looks strange on my hands. I shall do a swatch in the future to show everyone how it looks though because it is a great sky blue creme polish.

I do not remember exactly how long this particular polish/shade lasted before chipping because this is a very overdue post (SORRY!! =X). However, I will definitely update this post when I wear it again! I think this might have been either one thick coater or 2 medium coats. Again, I will update this later!


Base Coat + Polish + Top Coat
Take with flash and under artificial lighting


****Small Update****

I'm still alive! But some of you probably already know that because I leave comments here and there. I didn't expect the rest of April and pretty much probably all of May to be consumed by school. The former seniors, now alums, of my school, never mentioned this... I feel just as stressed as I have always been. Whatever happened to having senioritis? *sigh* I guess it's a good thing. Still keeping my game up :] Hopefully after my last big exam next Thursday my teachers will feel considerate enough towards us seniors that we won't have too many major projects and homework to complete without the last (I think less than 40 days) full days of school. I can't wait got the end of June to come!! Congrats to all/most college students who I think already finished their school year ^__^ College..coming so fast!

On a non-school related note: Is anyone else suffering from terrible allergies this spring season as well?

Swatch: Orly Galaxy Girl

I was so excited when I saw this at my local CVS. Many people have said that this is a close dupe of MAC's Formidable! I do not own that one because I felt it was too expensive at the time and when I saw comparisons I thought that I'd just get this instead when I find it. I believe this came out even before MAC's Disney collection so my CVS is very very slow at release out new products like this. Thankfully I discovered this early because I went back a week or so later and didn't see that many polishes in the collection, Cosmic FX.

Excuse my terrible cuticles. I'm too afraid to push them myself =X


Base Coat + One Layer of polish
Take with flash and under artificial lighting


Base Coat + 2 Layers of polish + Top Coat
Take with flash and under artificial lighting


Base Coat + 2 Layers of polish + Top Coat
Take with flash and under artificial lighting


Base Coat + 2 Layers of polish + Top Coat
Take with no flash and under artificial lighting

The colors are pretty true to how it is in real life. I was a little disappointed that it came out to look more like a dark red/blood/wine color because I really liked the purple duo-chrome shade it was in the bottle. But it is very pretty none-the-less. This polish is definitely on the sheer side and requires 2 thick coats or 3 medium coats otherwise you'll have a lot of streakiness like the first picture has. I don't remember how long this particular nail polish lasted on me because I wore this about a month ago =X I'll update on this detail when I wear Galaxy Girl again.

Swatch: OPI Pink of Hearts

Another nail polish swatch! ^__^

I was able to relax (finally) on Friday (so I wouldn’t be stressed on SAT day)...SO I did my nails :]

I was looking for the Essie Good to Go top coat and I saw that the store where I usually get my nail polishes had the OPI’s nail polish for Breast Cancer Awareness Month and it was a pretty sparkly pink. I couldn’t resist (my self-control is worse than I thought..LOL)!

OPI describes it as a “pale pink with a shimmer of hope – and an uplifting sparkle”.

I used 3 coats because it looked a bit streaky with less than that (or it could be that I'm not used to applying sparkly polishes..)

**For base coat I used Seche Clear and top coat I used Essie Good to Go**


Taken with natural light & flash

Taken with artificial light & no flash

Taken with artificial light & flash

Taken with artificial light & no flash

--------------------

I don’t know if anyone will notice, but the image quality should be better than before (I got a new camera) ^__^